Basic brooch tutorial, 2

Hi Folks! And....we're back!
(as always, click on the picture for a bigger version)
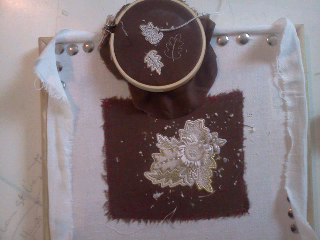
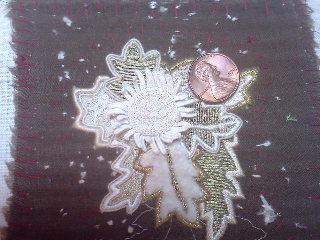
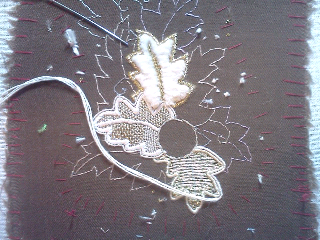
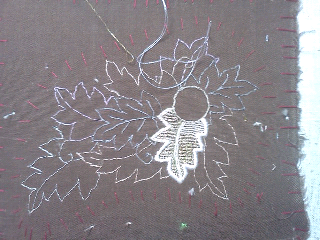
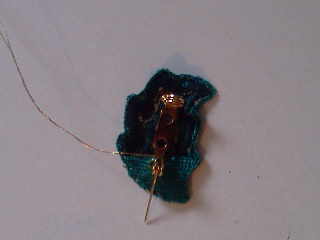
Transfer the pattern to your fabric by your preferred method. (If I can figure out how to do it, I'll post a pdf of this, it's just a nice basic shape) In this case I'm using prick and pounce. I drew the pattern on to a piece of scrapbooker's parchment paper, poked holes with a thick needle, and then used sidewalk chalk, and a stiff brush to transfer the pattern. I then connected the dots with a white gel pen (I love those things) If I was only doing one of these brooches, I'd have used a piece of tissue paper, and just stitched through it. I'm outlining the pattern with two strands of floss, worked with split stitch. Go around the pattern twice, and keep the stitches close together. This step is reinforcing the edge as well as providing padding for the future buttonhole stitching. 

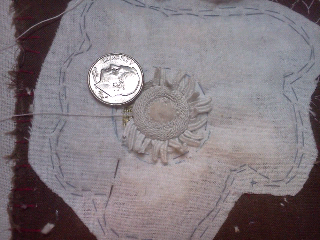
Take a short length of the wire (about 6-8 inches) and couch it down around the outer edge of the stitching. Make sure to 'snug it up' to the stitching. I use the rayon because it acts more like a flat thread, and pulls in tighter then most others. This is a personal choice, you may not notice a difference. 

Since I'm pulling the stitches so tightly, I've *heavily* waxed the thread, it helps, not perfect, but it helps. 

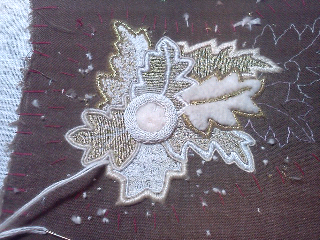
A couple notes...Plan on at least 12 stitches per inch, you want this well anchored. Also, watch for slipknots on the back, they will make you cry later. (Not that I've had this experience, nope) (What will happen is that the wire will spring off the fabric, after you cut the form loose. I've had this happen a few times.) And finally. Don't start the wire at a center point, or in a visually obvious location, when you join up the end, you'll likely have a small bump of stitching, if you center it, it sticks out like a sore thumb. 

More on Monday! Have a good weekend, everyone!


Basic Brooch tutorial

Hi folks! I'm trying out an experiment with some of the settings on the blog, and trying to do a tutorial on how to do a basic brooch, this could be fun. (or a disaster of unprecedented proportions, leading to the doom of all mankind. But, that's really the worst case scenario, and utterly unlikely. ... I hope)

So here we go. ...
I'm doing a basic brooch for this. The goal is to have a project that takes between 6 and 8 hours for me to finish. (I've learned that students work faster than I do. This makes sense, since they don't see the same errors that I will, and move faster. I'm more deliberate, since I *really* hate pulling out bad stitches.) I will not be doing a demo of how to finish the back. I'll just use some really good glue and a pin back, it will still look great from the front. Or at least that's the plan. 

So, the first picture is of the necessary supplies for the first part of the brooch. you see the cast of characters up above. Here they are as an ingredient list.
  • Embroidery scissors
  • 4" embroidery hoop (not shown, the inner ring is wrapped in wool, to give it more tooth)
  • Brown tightly woven cotton (not a twill, more like cotton sheeting) The color isn't so important, I have about 40 yards of it. 
  • Needles: #10 Milliners' needle--it's long, straight, and strong. #9 Embroidery also very strong, good for working with multiple strands of floss. #12 Sharp, my preferred needle for couching. The brand is usually John James, since that's what I'm able to find in my area. 
  • mystery DMC embroidery floss, probably ecru, but it could be anything. Since it's for padding under other stitches, I'm not worried about the color. 
  • 28 gauge wire, for couching around the shape
  • Sulky rayon thread, waxed (heavily, no really, very heavily)
  • And optional, tweezers and a tailor's awl for poking and pulling the wire into position. 
In tomorrow's post I'll start getting to work.
Happy stitching everyone!

Huzzah!

It's DONE! Just to recap, this piece was about 270 hours, but it's done. And, that's what matters. Honestly I'm thrilled with how it turned out. I could have done more embroidery on the back, but I don't think it was necessary, the back looked really good as is. (I worked it with a single strand of gold, and a single (rather than doubled) thread) I have a note that I may need to do a piece with that technique on the front, just need to figure out the right use for it.

And now, the pictures, as always, click to enbiggen.


Happy stitching everyone, and go out and enjoy the weather, it's beautiful out there. 

Still going...

Hi folks! The first wired edge is done! Now, I'm laying in a split-stitch stabilising edge, and then, the final wired edge!


Progress!

Well, it's getting there! A few more leaves, and maybe a vine, and I think it will start to look like something ;)


Still going...

Good afternoon folks! The brooch (of DOOM™) is coming along. Today I cut out the little leaves, see if they fit, back & edge them, and...hopefully, attach the petals.


Happy Wednesday!

Good morning, folks! I have strong coffee, and the world is good.

I've also started the next text piece. (I'm working on it for a couple hours a day, as a break from the stitching.)

Drive safe out there!


More progress...

Okay, after a short nap, I'm back for round 2 vs. the needle-woven* picots.

*in this context, 'needle-woven' is a euphemism for something quite vulgar.


150 hours, so far

I thought I'd share a progress picture, before I put on the protective covering. (to work on the center section)


Still moving along

Happy Valentine's Day, folks!
The brooch is truckin' along and I forgot how much I enjoy doing overcast stitch.


Peacock 1

Good afternoon, folks! It's a lovely, blustery 50 degrees today. And, I have strong coffee brewing.

I'm finishing the teal/peacock brooch today. It's part of the package heading up to Meredith gallery, of the League.

Go enjoy the weather!


Text art 1 is done!

The first, of twelve, pieces of text/calligraphy art, is done! It took about 100 hours and is currently at Rowland's getting mounted, matted, and shrink wrapped. (I'll get it framed later, once I find out if I successfully get juried for the League of NH Craftsmen, in calligraphy) This week, I'll be finishing up some embroidery pieces, and get those out as well.
(for those that are curious about the text, it's the Psalms, in Latin, chapters 1-56)

Getting it done!

Good afternoon, folks! The current project is taking a bit longer than expected (quelle suprise!) So today is another marathon day. Onwards!


70 hours

So far there are 70 hours in this project. I think a 2 day blitz will see it done. Onwards!


Snow!

This is the view outside one of my living room windows.

The snow makes everything look so pretty.

Have a great day!